1/01
It is the start of a new millennium, and I am still grinding off paint. As exciting as this task is,
I will be glad when it is finished! Since the temperature is usually between 28 and 30 out in the garage,
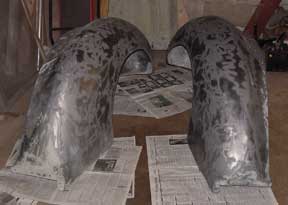
it is a good job for this time of year. I removed all the paint and old bondo from the front fenders. They
are in remarkably good shape for their age (pristine compared to my Toyota). They need some minor welding
where some splits are starting and some other minor fix up work. The insides were coated with mud and rust-like
crap, and when I removed it I found paint (yes, paint!) underneath. There was rust beneath the paint so it
had to go. The inside of the right front fender had Washington blue underneath and the left had brown primer.
The right also had lots of bondo to level out "wavy spots" and the left had none. I wonder if the left front
fender is a replacement? I will never know for sure. Both have their share of rust pits. I will have to hit
the rust pits with a sand blaster outside in the summer. Right now they are both bare metal and coated with
Picklex 20 so that they don't rust. Now on to the running boards. I have four to choose from. What would I rather
deal with -- rust pits and rusted away metal or just more and deeper rust pits? I decided to use the left side
off the '38 and the right side off the '39. Now to start grinding off the paint and rust (mostly rust).
2/01 My "strip the big sheet metal parts to the bare metal" phase continues.
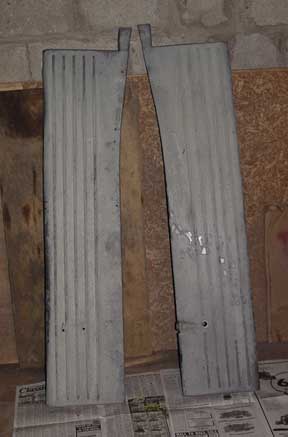
I removed all of the rust
and whatever paint was left from the running boards. The ridges running the
entire length of the top side made that job go slowly. There are a lot of deep rust pits, especially in the
area where the cab hangs over the running boards, that
will take some work to fill later on. Once that was done, I looked for something easy to tackle
next (deluding myself, of course, that there is any easy part of this project). I decided to tackle
the rear fenders. When I got the trucks, they came with two extra sets of repro rear fenders, one fiberglass
set and one steel set. When I got the trucks home, I stashed the fenders in the chicken house (yes, I have a
chicken house--but no chickens--I use it for storage) and hadn't looked at them since. I remembered
the steel set was a light brown primer but there were some scratches in the primer that showed rust.
I didn't know what kind of primer covered the fenders (maybe "shipping" primer that had to be removed?)
and didn't know if the primer would be compatible with the PPG paints I am using.
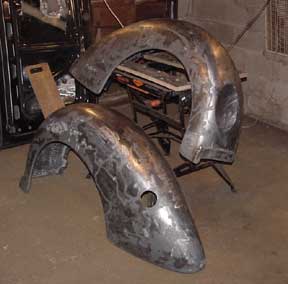
I decided to strip them down to bare metal. I dug out the fenders. They were nice, straight, and steel. Easy job. I hooked up the 7-inch sander and went to work. The bondo started flying. Bondo???? Wait a minute. There isn't supposed to be any bondo. I continued sanding some more and found rust pits and a weld line. I then realized that these were not repro fenders, they were original fenders that someone had expended a great deal of effort to bring back to pristine condition. And here I am with a sander, removing all of their hard work so that I could repeat it. I had to think about this one. I put down the sander and went outside to stand in the snow and get some fresh air (I didn't want kerosene fumes clouding my judgment). I could clean up the nicks in the primer and the places where the rust was coming through and save myself a lot of work or I could strip them to bare metal. After closely inspecting the fenders and weighing my options, I decided to take them down to bare metal. The whole time I was doing that I kept wondering if it was the right decision. I think it was. I removed a lot of bondo. I uncovered some rust, but not much. I uncovered some beautifully done hammer-welded patches. I uncovered bondo that was way too thick in some spots and some holes through the fenders that were just filled with bondo. That may be OK if this was going to be a show truck or if metal filler was used, but not on a daily driver. My goal is to do this right once and not see rust or bubbling bondo coming through the paint in a couple of years.
3/01 For a refreshing change of pace, I did the doors this month.
I pulled out what was left of the
window channel and tossed it. I removed the glass. It was old, not original, but still usable. I removed the handles
that were left, the window regulators (also known as the cranking mechanism), the latching and locking
mechanisms, and whatever hardware was associated with the doors. The locking and latching mechanisms
were rusty and hadn't seen lubricants for decades. Maybe that's what made them so hard to operate? I need to
study these carefully so I can figure out how to add an electronic remote entry. Only the passenger door has a key lock
and I am NOT going to be entering by the passenger door and sliding across the front seat every day. Nor
do I intend to leave it unlocked anywhere.
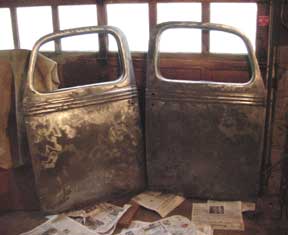
It was nice not to be wearing hearing protection, a respirator, a face shield, and heavy gloves and to be working with actual hand tools! I did get suited up in all the safety gear to remove the paint. Maybe its from the safety training I get because I work on hazardous waste sites, but I really do firmly believe in personal protection. Besides the rust (iron) and the dust, the yellow primer is full of zinc, the original paint is full of lead, and bondo dust is full of whatever it is (I'm sure it is somehow toxic). I really don't want to be breathing all that dust and those heavy metals. Anyway, the idea at this point is to get the paint off, assess the damage, and plan repairs. The lower door bottoms were rusted out on one side. I called around to see if anyone made/sold lower door patch panels. No luck. I guess I will have to make my own. Other than that the doors seem to be in good shape. I coated them with Picklex 20 and set them aside. They said that one 16 oz bottle of Picklex would do a car. I guess they didn't mean one completely stripped to bare metal. Or maybe I am too generous with it's application (polite way of saying I use more than is necessary and waste the stuff). After the third pint bottle, I purchased a gallon for not much more than the price of two 16 oz bottles. On most of the panels it's just yellow primer on metal, no original paint. I wonder where the original paint went? I'm sure there is a story there, if only my truck could speak. I also took the trim off the grille. The grille seemed to be in excellent shape with only two or three bent ribs. When I got the trim off I discovered that the bottom was mostly rusted away. Bummer... I see more metal fabrication in my future. I will remove the paint from the grille with the sand blaster when the weather gets nice. It looks like way too much work any other way.
4/01 I removed the paint from the hood. It was in excellent shape with one small dent that was
filled with bondo near the ornament. The underside was original Washington Blue. I decided to
leave the original paint and only remove the paint around some large scratches. As usual, there was
some rust under the paint, so off came all of the paint. The bed sides were next in line. I picked the best
two out of four bed sides I had, so one side of the bed will be from the '38, and the other
will be from the '39. These are
not pristine pieces of sheet metal. A sane person would probably toss them and order some repro sides.
But not me (I can't decide if I am insane or just naive). Even though some areas look like Swiss cheese,
I want to keep as much of the original sheet metal
as possible, so I will attempt to repair it. I got the paint off three of the sides. The inside of the 39 bed side
is solid rust, so I will sand blast it. There are a lot of rust holes along the bottoms where they were riveted
to the subframe. I guess it is a good place for water to collect. And then there is the odd hole and crack here and there
that will need to be fixed. And dents that will need to be banged out. Repro pieces are looking better and better, but
I think I will give fixing these a shot. After all (as I keep telling myself) this is not a show truck, it is a
daily driver. I will be carrying lumber and stuff back there. And probably putting in my very own scratches and dents.

5/01 I sandblasted the rust pits on all of the sheet metal that
I spent the winter removing the paint from.
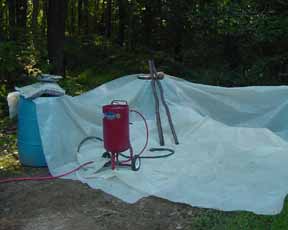
This time I did the blasting outside. I picked a nice spot in the woods and set up three 55-gallon drums.
I scrounged the drums from one of the hazardous waste sites I worked on. They were meant to store contaminated
water but were never used and were left behind by one of the site contractors. I used them to support a
plastic backdrop and laid more plastic on the ground. I ran 150 feet of air hose from the compressor out to the
woods, set up my blaster, and went to work. It's a good thing I don't have any nearby neighbors. They would
probably have called the police with all of the dust and noise I created. The little
plastic window in my hood frosts fairly quickly and I really hate not being able to see what I am doing. Eastwood
wants almost $4 per window, so I made my own. Shop Tip: I went to Staples and bought a pack of overhead transparency
film. Using the old window as a template, I cut two per sheet. They are much flimsier than the stock window,
but they work fine and I can make 50 of them for $4. As soon as one gets frosted, I remove it and put a new one in.
I got all of the big sheet metal parts done. The bed sides took a long time to do, especially the one that
was all rust on one side. I also blasted the entire upper sides of both running boards because they were badly
pitted. Some areas are now full of pinholes where the rust ate right through or made the metal so thin
that it was blasted away.
I took the pictures of the sheet metal above after they were blasted. The lines
are caused by moving the blaster from rust pit area to rust pit area. After blasting, I wiped the parts
down with solvent and put a coat of Picklex 20 on to keep the rust away until I get a chance to prime them.
6/01 I decided to remove some of the dents and straighten the metal before priming.
The accepted
practice is to (1) blast (2) prime with epoxy primer within 24 hours (3) grind off the primer and
patch and straighten. Since my blasting was strung out over time, I coated everything with Picklex 20
to keep it from rusting. I went from step 1 directly to step 3. I welded in a few small patches where
the fenders needed them. Where someone banged the tops of the front fenders flat and drilled a big hole
to install turn signals, I banged the metal back out and welded in a patch. The running boards were very
pitted and, in some places, pinholed. The accepted practice would be to cut out all of the bad metal and weld
in new metal. I would have to cut out a lot of metal to where it was thick enough to weld to. However,
I did blast the running boards and took out all of the rust. And I did have access to both sides.
The running boards seemed fairly sturdy, so
I decided major surgery was not in order. Where the metal was weak, I made some large, flat plates out of 16 gage
metal, sprayed the patch and underside of the running board with weld-through primer, and welded in the
plates to provide support. I will fill the top side of the running boards with metal filler after priming.
The day before painting, I scuffed everything. I prepped the cab for painting where I had not yet painted
(except where I still have to weld up the
holes in front). I must have missed putting Picklex 20 on the front
of the seat riser because it had a coating of rust on it. Everywhere else, the metal looked like the day I
applied the Picklex many months before. I guess the stuff really works!

Now the priming... But first, I had to build a spray booth. I decided to go with the positive pressure model -- where air is blown into the booth, pressurizing it. That way you don't pull dust and debris into the booth from everywhere like you would with a negative pressure booth (where you suck air out of it). Off to Home Depot for the biggest cfm gable (attic) fan they sell and some 2X4's. I built a frame out of 2X4's to fit one of the garage windows (the "air inlet" window), nailed 1/2-inch plywood to it, cut out a hole, and mounted the fan. I made another frame for one of the other windows (the "exhaust" window) and stapled some Home Depot 48 cent furnace filters to it. I also stapled a furnace filter to the front of the fan, but it restricted air flow too much. Since the fan pulls in air from a dense stand of pine trees, I don't have to worry about dust and dirt (especially since it rained for 4 straight days before I painted). I stapled a piece of window screen in front of the fan to keep the bugs out. I also bought a 10-foot wide by 400-foot long roll of 1-mil plastic at Home Depot. The stuff is surprisingly strong! With my trusty staple gun, I covered the entire ceiling of my garage in plastic. That keeps the missing media from falling into the paint. Next I went around and covered the walls in plastic. I mixed the paint, loaded the gun, turned on the fan, and primered the front and rear fenders, hood, running boards, doors, and most of the rest of the cab. Everything worked perfectly, and the paint looks good!
7/01 & 8/01 Where did the summer go? This should be prime time for
working on the truck... But when it
comes down to the choice of going to the beach with the kids or sanding bondo all day, I'm off to the beach.
And I did have to do some wrenching on my fleet. You know that sinking feeling... when two out of your three
daily drivers are up on blocks
and the one you are depending on to get to work starts making expensive sounding brake noises. Everything is
running again for the time being. I managed to take two vacations this summer.
One was south down the Blue Ridge Parkway.
I paid a visit to the Corvette assembly plant in Bowling Green, Kentucky. The other was north to Mass.
Despite the beautiful weather outdoors,
I did get the front fenders in shape and ready for the high build primer. And I almost finished the running
boards and rear fenders. The running boards were quite pitted. The flat parts were easy to fill, and sanding the bondo
flat between the ridges was easy. I found a piece of square walnut trim the exact size I needed and made a sanding
block that fits perfectly between the ridges. I bet I'm the only guy around with a solid walnut sanding
block! The ridges also
are pitted, and they are taking longer to fill and sand. By the way, when I say bondo I don't mean Bondo from
Pep Boys. I like and use Evercoat products. I use Evercoat Rage for filling and Evercoat Easy Sand as a
glazing putty for filling the tiny imperfections. I get these from my PPG dealer where I buy my paint. He orders
stuff for me (like Easy Sand) that he usually doesn't stock.
9/01 I thought I was done with the hood, but... After a fun cruise, I was putting my '62
Austin Healey (all original) away in it's garage (an oversize storage shed). I have the hood leaning against one
of the garage walls. The sun
just happened to hit the hood right and illuminated two high spots. I took it back to the garage, tapped them down,
and reprimered. Now it's done and ready for the high build primer. I hope. I also finished the "major" bodywork
on the front and rear fenders and running boards. That means the rust is gone, the rust holes are gone, the high
spots are down, and the low spots are filled. They are epoxy primered and ready for the high build primer next
spring or summer. They are not perfect. There are nicks and scratches and I'm sure many more low spots, but that
can wait. I also coated the undersides of the running boards with Zero Rust as a rust preventative.
I read somewhere that when you do a frame off restoration you should have the equivalent of a five bay garage to
store the parts. I am begining to understand. I have the fenders wrapped in masking paper to keep the dirt and dust
off and keep them from being scratched. I can't pile them up in the chicken coop anymore. That means they are taking
up a lot of space, and I am starting to run out of space. Yikes! I could store them in the Toyota until I get it
running again.
10/01 To get ready to tackle the bed sides this winter, I started with the bed subframe. This is the frame that the bed sides are riveted to and the rear crossmember (under the tailgate) mounts to. The subframe is bolted to the frame, and that is what holds the bed on the truck. I had the subframes from both the '38 and '39. Each had their share of rotted and mangled pieces. I ground the heads off the rivets that held them together and punched out the remains of the rivets. From the pile of pieces, I selected the best ones to build one subframe. I took these pieces out to the woods and sand blasted them (see picture of my sandblasting setup with the subframe sides). Then I coated them with Picklex 20. After the Picklex was dry, I scuffed them and painted them with Zero Rust.
Next on my list was the gas tank. The gas tank has some external rust, but looks pretty solid and useable. (New ones
run about $200+ for polyethylene and $400+ for stainless steel.) The first thing I did was to drain the tank. I poured
out about 3 gallons of a thick, dark amber, foul smelling, vile liquid. It really really really stunk. I mean it
REALLY REALLY REALLY STUNK! BAD! I was burning out a stump on the same day and decided to use some of this former
gasoline to light the fire. I had to hold a match to it for it to catch fire. I guess the volatiles evaporated
years ago. Fortunately, the County Health Department was sponsoring a hazardous waste collection day at the local
high school. I loaded the 3 jugs in the back of the Toyota and drove it over. They accepted my gift.
I banged on the fuel tank and shook it and poured out about a quart of rust. Not a good sign. I attempted to remove the
drain plug from the bottom of the tank. It is rusted solid. I did not think it wise to heat it with the torch. Most of
the screws holding on the sending unit cover were damaged. With great care I removed all but one. The last
one came out as a mangled mess using vice grips. At least I did not break off a screw. I let
the sending unit dry in the sun all day and sealed it in a heavy duty zip lock bag and put it in the garage. It
sure stunk up the garage! I bought a tank sealer kit from Eastwood. The first step was to flush out the tank with water.
I took it out to the woods and did plenty of flushing. I peered inside and saw a lot of varnish and crud build up.
I need to deal with that before I go to step 2 -- metal wash. I don't think this kit will do
too much to the varnish buildup.
11/01 I spent a whole day trying to clean out the fuel tank. A lot of crap came out.
A lot of interestingly colored
yellow and brown liquids came out. I flushed. I shook. I rotated. I still couldn't get all of the crud out.
Confident that the tank would no longer blow up, I welded a large nut onto the rusted, rounded off drain plug. I
used a generous amount of metal inside the nut and had the whole thing glowing red hot. That must have loosened
up the plug because it came out like it was brand new. Next I
called around and found Dick's Radiator Shop. Dick said that he would clean out and seal the tank for less
than the cost of the Eastwood kit and extra chemicals it requires. So off to Dick's Radiator Shop I went.
I almost missed the shop. There was no address on the building and only a small
hand-lettered sign that said "Radiator Shop" on the pole outside. The old industrial building looked mostly abandoned, and
the radiator shop occupied a small part of it on the side. I had to look for another small hand-lettered sign to find
the right door. I dropped off the tank, and I am waiting for Dick to call. This is the first job I have farmed out.
I spent the rest of November on the cab. Last year when it was cold out, I welded in new metal in both front cab
corner areas where the metal was all rotted out.
I finally got to doing the bondo and primer there and also underneath the
back of the cab. Next I tackled the cowl vent and rear window areas. The metal below the cowl vent gasket and
in the bottom of the rear window was rusted and full of pinholes. Cutting out and fabricating metal work in both
of these areas is way beyond my skill level. I had sandblasted both areas and treated them with Picklex 20, so the
rust was gone. To strengthen these areas, I built up the metal underneath with tiger hair. Tiger
hair is strange stuff! It is long-strand fiberglass imbedded in epoxy resin. Kind of like fiberglass insulation
in a thick, stick paste. It is not easy to work with in tight, confined areas like the ones I was using it in. After I got
a layer of tiger hair underneath, I filled the pinholed area with All Metal filler.
With the tiger hair underneath, the filler
did not disappear through the pinholes. I also sealed the gutters and the seam above the windshield with urethane sealer.
I filled a small dent I missed on the cab and added and subtracted volume from the roof corner that was crushed. Then I
primed everything. I still have to weld up the holes in the firewall. I am saving the welding jobs for January
and February. The unusually warm November weather permitted me to do bodywork and shoot some
primer right up to the end of the month, so I took full advantage of it. I am still not completely happy with that roof
corner...
12/01 The beginning of December was unusually warm. I started stripping paint and
rust from rest of the larger
pieces of sheet metal. I even got to spend a day sand blasting the odd nooks and crannies and rust pits.
I stripped one of the front inner fenders. It looked
pretty good. I started striping the other, and under the rust and paint it was very beat up, like someone worked it over
with a hammer. And lots of rust holes opened up. I decided to go out to the woods and see if I could remove an inner
fender from the '39 without having to actually remove the fender. I really did not want to dismantle the front end. As
hard as I tried to budge the rusted bolts, they would not give. So... I hauled out the impact wrench on the end of
200 feet of air hose and the bolts came right off. Yes, you can remove an inner fender without removing the fender.
There are now about 2 bolts holding the front of the '39 together.
By mid-December the temperature dropped so that it has only been above freezing a few hours a day. The temperature
dropped to below freezing in the garage, and with the holidays and everything, I just not have not been able to
drag myself out there.
I am still waiting for Dick to call about my fuel tank...