JANUARY - FEBRUARY 2005
I wanted to use the original 1938 gages and speedometer, so I dug out the box I put them in after I removed them
during the last century. Guess what... I don't have any original gages! One of the previous
owners removed them and replaced them with some
used, bent and dented, black face with white lettering gages that look like they came from a '58 Plymouth.
The temperature gage was stuffed in where the old bulb style temperature gage used to be. The back plate was
butchered to fit everything in. Time to go shopping on ebay... I picked up a nice '38 faceplate with
a non-working temperature gage, a 12 volt fuel tank
sending unit, and NOS fuel, oil pressure, and volt gages. The original is an ammeter, but I figured that
hooking a 60 amp gage to a 160 amp alternator was asking for a fried gage at best and a dash fire at worse.
The gages are electrical, which are compatible with the Mustang engine. I installed the NOS gages in the housing.
I wired up the fuel gage to the sender with a 12 volt battery and it worked perfectly. I wired up the volt
gage to a 6 volt battery and it worked perfectly. Since I have a 12 volt system, this wasn't going to do,
so I ordered two (one for the volt gage and one for the oil pressure gage) "Runtz" 12 volt to 6 volt reducers
from Speedway Motors
(P/N 910-64101). After fooling with the old temperature gage and housing, I decided that there
was no way I was going to stuff a temperature gage in the hosing without it looking like crap, so I decided to keep
the original temperature gage (it reads 212 degrees all the time) in the housing. I wanted an in-dash tachometer,
so I ordered a tachometer and temperature gage from
Classic Instruments . I got the gages in their
vintage series, beige with chrome bezels, so that they wouldn't clash too badly with the stock gages. [As an aside,
I called Classic Instruments to confirm that it would be folly to connect a 60 amp gage to a 160 amp alternator
and they agreed; they did offered to build me a custom 100 amp gage for $450. I passed.]
The gages and speedometer are lit by two bare bulbs in holders attached to the speedometer housing. They were
6 volt bulbs with Ford script, probably the originals. NAPA had identical 12 volt replacement bulbs plus
some single contact pigtails to replace the original ones with the deteriorating cloth covered wire of
dubious electrical worth.
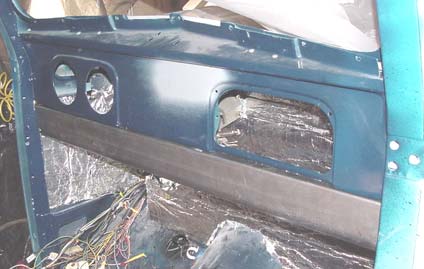
Now I have two extra gages to put in the dash plus a radio/CD player, plus the heater/AC control, plus three A/C vents, the headlight switch, fog lamp switch, and switch for the Ahoogah horn. OK, it's probably silly, but I always wanted a vehicle with an Ahoogah horn. I know the time period isn't right -- it belongs in a Model A -- but it's a lot closer than, say, putting one in my '91 Tracker convertible. Besides, I am building this truck because I want one to fit my own specifications and dreams, something that will be a blast to drive. OK Enough rationalizing. Where was I? Oh yeah, the dash and how there isn't room to cram all this stuff in. I didn't want to attach those little tacky vents to the bottom of the dash (sorry if you have these in your truck, no offense meant). So here I am trying to figure out how everything is going to fit when the latest Bob Drake sale flyer shows up in the mail. I thumb through the flyer and my eye catches a "Hide-a-Switch Panel" for a 1937-40 passenger car. So I called Bob Drake (not Bob himself, actually, but his company) and asked what the dimensions were. They said they didn't know and couldn't measure it because they were out of stock. I said, "But I just got the flyer today." They said to call back in a couple of weeks. I did. The dimensions sounded like it might work for a place to mount the A/C vents and the radio/CD player, so I ordered one (P/N BP-371038 $45 on sale). I had to trim a few inches off because it was too long and do a little grinding on the sides to make it fit better, but I think it will work. (See the picture to the right. Notice in the picture that I insulated behind the dash. Also notice that the wiring is still a rat's nest.)
Next month.... working up the courage to drill a 3-1/4 inch hole in the dash for the tachometer without screwing it up (the dash or the hole or both, that is).
MARCH - APRIL 2005
It's time to drill some BIG holes. First I needed to drill a hole in the floor for the steering column.
The Explorer column is about 3 inches thick, and I did not own a hole saw that large. Big hole saws are expensive.
and I needed one for a one-time use only. I went to the Harbor Freight store about 30 miles from my hose. Usually
I buy only good tools and avoid the cheesy ones. Harbor Freight has some very cheesy tools, but they are cheap.
I purchased a kit of 5 carbide hole saws. They were cheap and nasty looking -- big chunks of carbide welded to a
circular piece of metal. They looked like one time use only, but I only needed one hole. I figured out where the
column should come through the floor and drilled a pilot hole. I hooked up the carbide hole saw and went to work.
It wasn't drilling, more like wearing a hole through the metal. Eventually it went through and I had a hole. The
size was perfect.
Next was the dash. This kit had the right diameter saws for the tachometer and temperature gage, so I wore
some holes in the dash for them. After some light touchup, it was a perfect fit. Like my old supervisor at work was
fond of saying, "You can't lose them all." Looks like I might get another use
out of those saws, even though the chrome on the shaft they mount to peeled off after the first use.
Moving right along on the dash is the hole for the A/C-heater controls. That one was a rectangular hole of fairly
precise size. Too big and the control falls through the dash and onto the floor. My greatest fear is making the
hole hole too large, so I cut it undersized and very carefully and laboriously filed away the excess metal
until the hole was too large. Just kidding. It was the right size, but it took way too long to cut and file.
Same for the dash extension. I cut four rectangular holes, three for the A/C vents and one for the CD player. I
took the housing for the radio that came out of the Mustang and welded it onto the back of the dash extension.
Luckily it was metal and not plastic. I adapted the Mustang hardware to the CD paler and it goes in very nicely.
Next I will need to prime and paint the dash and extension.
But back to the wiring... Sometimes I question the wisdom of using the Mustang wiring instead of just
springing for a kit. I especially question the wisdom when I am trying to identify what the bazillion wires
hanging out of the dash are supposed to get attached to. Using my trusty "1988 Mustang Electrical and Vacuum
Troubleshooting Manual" I managed to identify most of the wires. There are still a few wires plus one
plug yet unidentified. The bigger problem was where to put the fusebox and relays and modules and controllers and
the wiper mechanism. The picture on the right was taken before I decided where to mount this stuff. Note the
actual size pictures of the tach, temp gage, and A/C-heater controls stuck to the dashboard with masking tape.
This helped me decide where to position them.
In the left kick panel I mounted the fuse box, wiper controller, cruise controller, flashers,
and three or four relays. In the right kick panel I mounted the wiper mechanicals box (but did not hook anything up),
the computer, also known as the EEC (which is a big 6 X 6 inches plus wiring harness plug), EEC relay, fuel pump relay, and
fuel pump inertia switch. This at least gets everything off the floor.

Yeah, sure. I know what all these wires are.
MAY - JUNE 2005
It's finally warm enough to paint, so I painted the dash a couple of times. I did the "bodywork" on the dash,
primed the bare metal, sanded and painted the dash, dash extension, and glove box door. I came out awful!
At first I thought it was trash in the paint,
but it was evenly spread on all the parts so I concluded it was surface contamination.
I sanded the paint, cleaned it very well, and repainted. The second time, it looked pretty good.
I managed to free up the rusted mechanism on the cowl vent and got that assembled and working. Next
I got out the Vintage Air under dash heat, A/C, defrost unit. It is the mini unit, the smallest they make.
It looked very compact in the box, but as soon as I set it on the floor of the cab, it grew three
times its size. At least it seemed to. After fiddling with it for hours, propping it up on wooden blocks,
hanging it from wires, holding it up, etc. I concluded that there was no good place to mount it where it would not
interfere with something. This is where setting the firewall back hurts. After much agony, I finally decided
on a location, drilled the holes in the firewall, and mounted it. It hangs pretty low, but it should not
interfere with passenger leg room. I will probably be the only one in the cab 95% of the time anyway. I mounted
the bulkhead fittings so the heater and A/C hoses can go through the firewall.
I cut and installed the heater hoses
on both sides. I also cut the A/C hoses to length and stuck the ends in the fittings. They need to be crimped.
I got out the yellow pages and called everybody in two phone books. The ad reads "Complete air conditioning
expert service. We do everything. Imports and domestic." "Can you crimp some hoses for me?" "Nope. We don't do that."
So much for the complete and everything parts. Some of them gave me the name of a place that does it. I
call and, you guessed it, they don't crimp hoses.
June was spent preparing for vacation and enjoying vacation. We went to Florida. We spent a full week
in the Keys. Nice!
JULY - AUGUST 2005
SEPTEMBER-OCTOBER 2005
NOVEMBER-DECEMBER 2005
I talked to the guy that inspects my fleet of vehicles and he told me where he gets his hoses crimped.
It was a long ride in the wrong direction, and I could not get there during the day. In mid-July they
started opening on Saturdays, so I took a ride out. Wrong brand of fittings; they would not fit
in their crimper. But... he gave me the name of a place near where I work that might be able to help me
out. Of course they were not open on Saturdays, and on the following Monday I was starting some work on
a superfund site with 14-hour days. I called them from the site, and they said they had a shop up the
road from where I was. I took the hoses there the next day, and they were crimped in a few minutes
while I waited for the grand sum of $5. End of that saga.
I decided it would be more convenient to do all the wiring behind and under the dash and hook up all
the gages and stuff without the steering wheel in the way, so I proceeded along that path. I hooked
up all the gages. They work, but the oil pressure gage pegs at 50 psi, which is what the Mustang engine
runs at cold idle. Next, I decided to check the speedometer by putting the cable on and hooking the other
end to a variable speed drill. That would have worked if the speedometer wasn't frozen. It sheared off
the little plastic end inside the housing and trashed the cable. The plastic took a little work to extract.
I guess I will have to get another cable on my next trip to the junkyard. And maybe another
speedometer. I installed and hooked up the
A/C-heater controls. They seem to work fine. I hooked up a headlight switch from a 91 Explorer. The headlights,
parking lights, dimmer, etc. all worked. I plugged in the steering wheel plugs to check those
circuits. No horn. Forgot to ground the relay. Easy fix. Four-way flashers worked. The turn signals came on
but did not flash. I know that this happens in cars of the late 80's and early 90's vintage to indicate a
burned out turn signal bulb. I was using the turn signal sockets and bulbs from the Mustang and they all
worked. Must be a bad flasher. I have three spares (don't ask why). I tried all of them. No luck. I pulled the
steering wheel out and checked the signal lever switch. No problem there. I traced and checked every wire. No problem
there. Six hours later I still did not have turn signals. In a last ditch effort, I went to the auto parts
store and purchased a variable load flasher. I plugged it in, and instantly I had turn
signals. Problem solved for $2.97.
I did a few other things, mostly involving drilling holes through the firewall. One hole for the E-brake cable.
One hole for the speedometer cable. One hole for the throttle cable. I also drilled a couple of holes in the
side of the cab for the radio antenna. I hooked up the Mustang gas pedal, so
now I can rev the engine from inside the cab. The open headers are LOUD in the closed garage! It separates
the car guys from the non-car guys. The non-car guys hold their ears and run out the door.
The car guys get a big grin...
I managed to get most of the wiring in. I freed up the speedometer and then went to the junkyard and pulled a
speedometer cable from 88 Mustang. I had to modify the end that went into the speedometer and installed the other
end in the transmission. The cable was the perfect length. I mounted the gages in the dash (see picture).
A 15 ohm resistor from
Radio Shack dropped the oil pressure gage into the usable range.
At this point I did a reassessment of where I was heading. The next BIG thing would be to do the final sanding on
the body parts, spray the top coat, and then attach them. But first I would need to spray the cab. I can't spray
the top of the cab in the garage because the ceiling is too low. Reminds me of the
corollary to Murphy's Law
("anything that can go wrong will go wrong") that goes something like "before you can do something, you have to
do something else first." So I need to spray the cab, or at least the top half, outside. Before I can get the
truck outside, it has to run and drive. To run and drive I need to... anyway, you get the picture.
My short term goal became getting the truck to move under its own power. I installed the driveshaft; now the
powertrain is complete. I installed the steering column. I bought a u-joint to fit on the steering box and a u-joint
to fit on the end of the steering column. Typically, a 3/4-inch wooden dowel is used to simulate the steering
shaft to determine its length and position. I cut a dowel to the proper length and joined the u-joints. Ooops.
The shaft was tight up against the header. I bought a third u-joint and a shaft support bearing (required when
there are more than two u-joints). I cut two dowels to fit and ordered two steering shafts.

There were a bunch of other things I had to take care of. Lots of wires hanging down to the ground needed to be
tied up. Both ends of the e-brake cable needed to be tied up. The braces I made for the x-member needed to be installed.
The battery, which has been sitting on the floor, needed to be moved into the cab. All of that plus a bazillion other
little details were taken care of. As soon as the steering shafts
arrive and I get a chance to install them, I can take the truck on it's MAIDEN VOYAGE!!! And then another
corollary to Murphy's Law will take effect: "When the truck becomes mobile, it will be too cold to
paint outside."
First the GOOD NEWS: I took my truck out for a ride in early November!!! Actually, I took it for a
ride several times! It was a blast to drive. It was missing a few minor items like the fenders, hood,
grille, doors, windshield, bed, exhaust system, etc. etc. The gas tank was a 2 gallon plastic gas
can tied to the rear axle with bungie cords. My son captured the maiden voyage on video.
I managed to turn part of it into a crappy low res video clip (to keep the download time to a
minimum and to keep from hitting my bandwidth ceiling). Check it out: MAIDEN VOYAGE!!! (350 KB)
Nothing caught fire. Nothing fell off. Nothing broke. Nothing blew up. A successful trip! Actually my worst fear was
having to answer the police officer's question "What the h**l are you doing on the road in that thing, boy?"
Luckily, the police were nowhere to be found that day.

The speedometer worked. The temperature gage did not. It was hard steering it on the first ride. Then
I did a quickie eyeball driveway alignment and got both front wheels pointed in the same direction (more or less).
It steered and drove much much nicer on the second trip. The rear wheels spun a lot. I imagined that it was
the result of the powerful engine; however, the truck is exceptionally light because it has no sheet metal
attached, and there is no weight whatsoever over the rear wheels. Note the shifter in the picture in the
Sept-Oct section above. It is from a sixty something F-150, slightly modified by heating and bending to the
right away from the drivers leg, and installed backwards. The shift knob is exactly where I want it to be.
It mates to the T-5 perfectly. I have been searching
the junkyards to find another one with better chrome, but have not seen another like it.
While preparing the truck for it's first outing, I decided to hook up the fan to an on/off switch since
I had not yet installed a sender for it. I installed the switch, clicked it on, and promptly
blew a 30 amp fuse. The fan did not move. Not good. When I installed the fan, I had to modify
the "universal fit" brackets
to fit, but I guess it distorted the fan housing enough to bind it. Because I
used the repro radiator mounting bolts with repro springs, I was able to unbolt the repro radiator support
rods at the top and tilt the radiator forward enough to slip the shroud out. It also allowed me to
get the fan out easier. I further modified the modified "universal fit" brackets and reinstalled
the fan. This time it worked flawlessly.
And Murphy was right. It did get too cold to paint outside...
