THE 1938 FORD PICKUP TRUCK PROJECT

THE HOME STRETCH


JANUARY - MARCH 2009    

I have recovered from by tick-borne infection, and I am back to work on the truck. After I painted the bed last fall, I just set it on the frame, which is where it sat all winter. The first chore was to securely bolt it to the frame. First I installed the rubber pads between the bed and the frame. Then I bolted it down using a combination of original, reproduction, and Home Depot bolts. Then I installed the rear fenders with the bolts only finger tight. Next was to finish all the stuff that would be under the bed floor. I put the exhaust system together using Purple Horny glass packs. It is nice and loud! For the last straight section of exhaust pipe, I used some steel pipe I had lying around. After I get the tailgate and bumper on, I will be able to figure out how long to cut the stainless steel pipes.

I purchased a set of stainless steel tail lights from Wescott's. They are a two-bulb system (brake and tail light), and I needed a three bulb system (brake, tail light, and turn signal). I went to NAPPA and purchased a pair of sockets that held two filament bulbs and dismantled them. I enlarged the hole in the back of the housings to fit the oval protrusion on the two-filament innards. The oval shape keeps the contacts oriented to the bulb and keeps everything from moving around. I had to "adjust" the bulb housing because the pin locations are different for one and two filament bulbs. I routed the wires through a stainless steel conduit that I picked up for $5 at a car show. The assembly ends in a plug (removed from my Toyota pickup before it went to the junkyard) so that the tail light assembly can be unplugged and removed if needed. I drilled some holes in the stake pockets and attached the tail lights with a stainless steel bracket. I added a license plate holder to the left side.

Next came the gas tank. I picked up a 12 volt sending unit, some 1/8 inch brass pipe and fittings from Home Depot, an intake fuel strainer from NAPA, the correct reproduction screws from Roy Nacewicz Enterprises, and some AN fittings from JEGS. My initial idea was to drill two holes in the top of the sending unit, one to accommodate the fuel pick-up tube and one to accommodate the fuel return line. I am using a fuel injection system that incorporates two fuel lines, one for supply and one for return. The hole in the gas tank is only 1-3/4 inches in diameter, and all of this stuff would not fit. I toyed with the ides of drilling a hole for the return line in front of the sending unit, but there is a baffle in the way. Finally, I settled on the idea of using the the original fuel line hole at the bottom of the tank for the return line (D in the picture below).

I assembled the pick-up tube from 1/8-inch brass tubing and fittings and installed the fuel strainer at the bottom (A in the picture below). I drilled a hole in the top of the sending unit and inserted the pick-up tube (B in the picture below). I installed it in the tank, but the pick-up tube offset the top of the sending unit and the screw holes did not line up. I enlarged the screw holes in the top of the sending unit (but not the cork gasket) and that worked (C in the picture below). Next time I do this, I will cut a second hole in the tank for the fuel pick-up and return tubes BEFORE I have the tank cleaned out and coated.
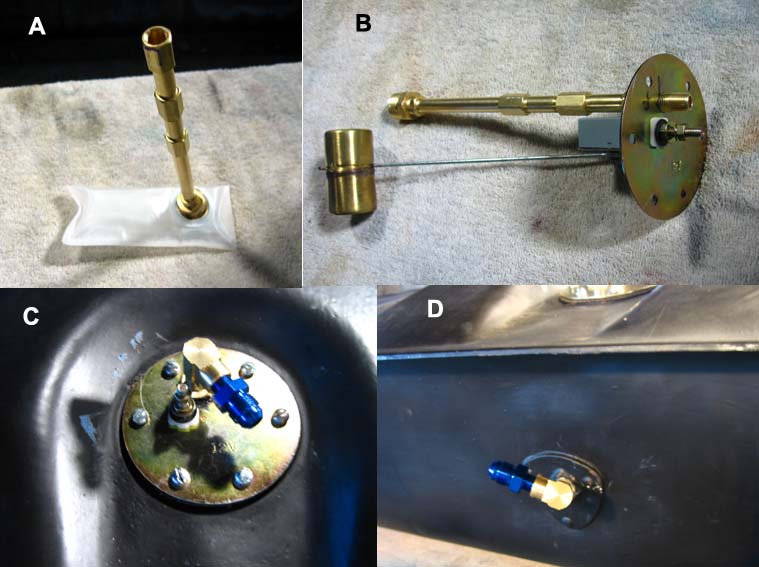
   

gas tank

 
APRIL - JUNE 2009    

My spring project was the doors. I hung the doors and installed the glass using a Juliano's power window kit. I actually did the right door glass some time ago, but had a problem with the glass binding before it got all the way up. I fiddled with it for a long time -- shimmed it this way and that way and tried all kinds of adjustments without success -- before giving up, I mean temporarily setting it aside. I installed the left window, and it had the same problem. In a semi-desperate attempt to try something I had not tried before, I disassembled the workings and cut about an inch off the channel that holds the glass. It worked perfectly! I did the same thing to the right side and it worked perfectly as well.

Next came the power door locks. I had some actuators that came from the donor Mustang and a junkyard Explorer. I tried for a long time to get the power door lock and key lock to work on the right door and gave up on the ides of using the key lock. It was a tight fit for the actuators. I had to grind off all the plastic nubbies to make it as thin as possible. I am using the arm rests with the switches from the Mustang, so I had all of the wiring. I got everything installed and all wired up. My truck now has power windows and door locks. Kool.

Finally, I attempted to install the remote keyless entry. I purchased a unit from Auto-Loc several years ago and installed it under the dash when I did the dash wiring. When I could not get it to work, I removed it and set it up on my workbench with a 12-volt battery, spare actuator, and spare Mustang arm rest (don't ask why I have a spare one). I wired everything together. I could hear the relays inside the black box clicking when I pressed the buttons on the remote, but no signal was coming from the wires. I called Auto-Loc and their tech help confirmed that it was wired correctly and that it may be a defective unit. However, since I could not find the receipt for it, they could not help me any further. I tossed it in the trash and I am in the process of looking for a remote keyless entry from a different company.

I did a couple of other miscellaneous things. One was to replace the ragged air filter that came with the Mustang. I wanted to buy one of those cool K&N air filters, but .... nothing ever seems to work easy. The Mustang came with a plastic 45 degree connector and a Purolator air filter with a 45 degree bend at the neck. The resulting bends made the air filter fit perfectly. K&N did not have an air filter with the proper bend. I looked at a bunch of different connectors but could not come up with a workable combination. I decided to just replace the air filter with a new one, thinking I could put on a new connector and K&N filter at some future date. The number on the air filter was partially missing. I ran a search for a 1988 Mustang, but the numbers did not match what I had. Using the numbers I could read and making up the ones I could not, I hit a match for Purolator A54855. The filter fits a 1994-2001 Accura Integra. What???? I took the number to the local auto parts store, pulled the box off the shelf, and pulled out the filter. It was identical to the one on my truck! How about that!


JULY - SEPTEMBER 2009    

The summer sure went by fast. August was spent preparing for a vacation, taking a 17 day roadtrip to Quebec and the Canadian maritime provinces, and recuperating from the trip.

I installed and hooked up the gas tank. I poured in some gas and got my son to watch for leaks when I fired it. I started the engine and ran it for a while. No leaks! Amazing! I think that is the first thing I ever plumbed together that did not leak.

I attempted to make a floor for the bed. I do not have the big bucks for a fancy oak plank floor with stainless steel strips etc like the magazine trucks. I scrounged up a 3/4 inch sheet of pressure treated plywood and went to Lowes and purchased a 5.4 mm (1/4 inch?) sheet of oak plywood (made in China). I glued the two together and cut it to fit. The idea was to seal it with marine varnish to make it waterproof. After a week, the marine varnish (one coat) was still tacky. Very strange. I never had that happen before. I stripped off the varnish with paint remover, washed it down with lacquer thinner, and then sanded it really good. I then painted it with exterior polyurethane. After a week the polyurethane (one coat) was still tacky. Very very strange. I gave a piece of scrap luan plywood a coat of the polyurethane and it dried overnight. Very very very strange. I concluded that the Chinese plywood was treated with some chemical that prevented the finish from drying. I promptly tossed that project into the woods. I still like the concept -- pressure treated plywood on the bottom and oak on the top. When I get a chance, I have to track down some non-Chinese oak plywood.

I installed the running boards. It took me 8 hours to put each one on. Yep, 8 hours. The welting had to be cut to fit. Then I discovered that rear fenders were lacking holes where the running boards attach, so they had to be lined up, clamped, and drilled. Where a bolt went through the frame to attach the running board, there was usually a brake line, fuel line, or wires that had to be moved and then put back. I also had to loosen up the front fenders (and all of the front sheet metal) to line up the front fender and the running board. At this point I tightened the rear fender bolts (which I had left loose). I had to drill two holes in each fender where a matching hole was missing in the bed, frame, or fender. Since the front sheet metal was loose, I thought it would be a good time to put the front bumper on. I dug the bumper brackets out of long-term storage and proceeded to bolt them on. Should be a 5 minute job. It appears that the grille and grille sides are too low for the bumper bracket to fit. I am not sure haw that is even possible. I guess my next project will be to disassemble the front sheet metal and get the bumper on.

My garage attracts furry little critters. Over the past winter season, I caught 35 mice and 10 moles in my traps. That is a new record. I am at a loss to explain why moles, which live underground, are attracted to my garage. Even in the dead of winter when the ground is frozen and there are several inches of snow on the ground!!! In September, I had an invasion of a different kind of critter -- toads. My wife keeps her Jeep in the garage, and the toads really freaked her out. If I toss them out the door, or even across the street, they are back the next day. I have to take them deep in the woods to release them so they won't come back. Sheeesh.


my truck


OCTOBER - DECEMBER 2009    

My truck is looking fairly complete but there seems to be a bazillion things that have to get done. It was a busy fall. I took off all the front sheet metal, drilled some new holes, and then reassembled everything so that the front end fits together without a huge gap on the right front side. I made a new bed using a piece of 1/2 inch pressure treated plywood glued to some AMERICAN red oak 1/4 inch plywood. The finish dried like it was supposed to. I installed the bed with 12 bolts. It should be quick and easy to remove if the need arises.

I bought a new remote keyless entry module, this time from Electric Life. The instructions told me I could cut the wires in the cab to install it. WRONG. Only one side worked. I had to run four more wires into the door and cut the wires there. The instructions said that I had to program the remotes. When I followed the instructions, nothing happened. Also, pressing the lock button on the remote unlocked the door, and pressing the unlock button locked the door. After checking five or six times to verify that the wires were hooked up according to the instructions, I called Electric Life.

Me: Hello. I bought one of your remote entry modules and I am having some problems.
Customer Service Rep: What is the problem?
Me: I am following the instructions on programming the remotes but it does not seem to be working.
Customer Service Rep: They come pre-programmed from the factory. Ignore the instructions.
Me: OK, but when I press the unlock button on the remote, the door locks.
Customer Service Rep: Just reverse all the wires.
Me: OK, but that is not how the instructions say to wire it.
Customer Service Rep: Ignore the instructions and reverse the wires.
Me: OK. Thanks. Goodbye.
Me (after hanging up): Why do they bother sending instructions with their product if the instructions are all wrong????

It did work fine after I reversed the wires. SHOP TIP: I used small wire nuts on all the wires while testing the unit. It made it quick and easy to reverse the wires.

I also hooked up a wire so the parking lights flash when I lock or unlock the door. Cool. Just like a 2003 Civic.

 
JANUARY - MARCH 2010    

It was such a cold, snowy winter, I had a really, really hard time dragging myself out to that cold, cold garage. Most times I convinced myself to stay in the nice warm house and wait for spring. I did get a few things done. I installed the rear bumper. Twice. The first time I installed it, it was obvious the bumper brackets were upside down. I finished the exhaust system. I polished the last 3 feet of the stainless steel pipes so they look like chrome. I installed amber fog lights because I like the look.

I took some necessary legal steps to get my truck on the road. To drive it, it has to pass state inspection. To go for state inspection, it has to be registered. To get registered, it has to be insured. First step - insurance. I looked at every company -- and there are quite a few of them -- that sells classic/hot rod insurance. I found only one that would allow me to drive my truck to work and take it for a joyride anytime I desire. So I signed up. With proof of insurance in hand, I went to an auto tags place. Since I requested regular truck plates (rather than antique plates), and my truck is titled as an antique, my title and a big pile of paperwork had to be sent off to Harrisburg, the state capital, for processing. I hope to see my registration card and license plate some day.


snow 2010

 
APRIL - JUNE 2010    

With a lot of luck I should have my truck on the road by the end of the summer. I made a checklist.... page 1 - things that had to be done for state inspection (aim headlights, install seat belts, fix license plate so that it was not obscured by rear bumper, replace broken windshield glass, etc.) and page 2 - things that could be done after state inspection (finish interior, etc.).

I am working my way down the checklist, but everything is taking at least nine times as long as I thought it would. Installing the seat belts is a good example. I installed them a long time ago and then removed them before painting the cab. The first problem was locating them. They were in a box somewhere in the garage. Next was figuring out how they were installed. I should have drawn a diagram or taken some photos. After much fooling around, I figured out how they were originally installed. Each side bolts to the floor in three places. Two of the three places had easy access BEFORE I put the running boards on. I was not about to remove the running boards, so I had to fabricate some brackets, drill new holes in the floor, and plug the old holes. Before I did the final installation, I decided that it would be difficult to insulate the cab with all the seat belt stuff in the way. I removed everything and insulated the back part of the cab. Then I thought that since I had all the insulation and glue and stuff out already, I should just finish the insulation on the inside of the cab. So I did. The shoulder belt part (note: not the correct technical term) was held on by a bolt. After looking at it, it occurred to me that once the interior is finished, I would not be able to get to a nut behind the panels. I drilled out the mounting hole, enlarged it considerably, and welded in a nut while trying not to catch my new insulation on fire. Two (10 hour) days after I started, I had seat belts.

Another thing on my list is "Check Cooling System." I run the engine in the garage briefly every now and then and drive the truck out into the yard once in awhile. Yes, I drive around in my backyard. I had never seen the temperature gage needle move. The fan is wired into the temperature gage but I can switch it on manually. I ran the engine for a while with the fan running and it got hot but the needle on the temperature gage never moved. I disconnected the sending unit and after much pawing around under the dash located the connector to the temperature gage. I put the meter on both ends and no connection. ???? The easiest thing to do, which was not easy, was to run a new wire. Now the temperature gage works. Goes right up to 220 degrees -- even with the fan running -- and something starts to spurt coolant -- which is where I shut the engine off. I need to fix this before I go driving around.
 
JULY - NOVEMBER 2010    

GREAT NEWS!!! My truck is licensed, insured, inspected, and ON THE ROAD!!! At long last!!!!

When I finished the "before inspection" checklist, I took the truck for a spin around the neighborhood prior to making an appointment at the state inspection station. The front wheels made a horrible squealing noise and left two continuous black marks on the road. Not going anywhere like that! I invested in a set of toe plates and fixed that problem. On the next test drive, the fuel pump seemed a little loud, and the truck wouldn't go over 3000 RPM. My first comment to my son, who was my test drive co-pilot, was that it felt like a fuel starvation problem. I could not believe that my fuel pump was toast with only an hour running time so I checked everything else. I even invested in a code reader ($35) which told me my coolant sensor was not working. That is when I discovered that I had removed the coolant sensor and replaced it with the temperature gage sender. After a trip to the junkyard for a replacement sensor ($3), the coolant sensor was replaced and the temperature gage sender was installed in the correct place. That solved my wacky temperature gage problem. I pulled the gas gage sender and pickup tube out of the fuel tank and learned that the strainer had fallen off and was somewhere in the tank. There also seemed to be some sediment in the bottom. I flushed the fuel tank and replaced the strainer with a more firmly attached model. After seeing the crap in the bottom of the tank, I was convinced that my fuel pump was ruined and ordered a new one. The new one was delivered, and the fittings were different. Then I had to order new fittings and wait for them to arrive. When I installed the new fuel pump, I moved the fuel filter from after the fuel pump (the recommended location) to before the fuel pump (the better location). The new fuel pump cured the problem. I had a successful test drive and made an appointment at the state inspection station. My truck passed, so now I can legally drive it anywhere. YAHOO!

Even though my truck is on the road, I still have work to do. The interior needs to be finished. I have to replace the junkyard tires and wheels with some new rims and wide whites. There is also a list of other items that need to be fixed and issues that need to be addressed. At least I am over the hump!

 
DECEMBER 2010 - JANUARY 2011    


As I write this, it is 7 degrees out and dropping. There is at least 6 inches of snow on the ground (where it isn't drifted). My truck is safely tucked away in the (unheated) garage until the weather becomes more reasonable for me to start working on the interior.

Last month when the weather was still somewhat hospitable, I pulled the sending unit / fuel pick up out of the gas tank to fish out the missing fuel strainer and maybe see why the gas gage quit working. When I yanked the stuff out, I saw that the float was missing from the sending unit. That explained why the fuel gage was not working. There were too many parts loose in the gas tank. I fished out the strainer. I had to make a special tool to catch the float and pulled it out. I noticed more sediment in the bottom of the tank. I also notice a strip of something in the tank, so I pulled that out. It was a strip of tank coating, white on one side and rust brown on the other. I started peering around in the tank with a flashlight and realized that the coating was peeling off and exposing rusting gas tank. Not good.

I decided that trying to use this gas tank would be nothing but a major headache for as long as I owned the truck, so I ordered a new tank from Tanks Inc. I also ordered an in-tank fuel pump. The tank arrived by UPS. It was a nice unit that was well packed. I drained the old tank and removed it along with the fuel pump that was mounted on the frame under the cab. I installed the new tank and fuel pumped, dumped 5 gallons of gas in, and went for a spin. Nice! The in-tank fuel pump is soooo much more quiet that the one that was under the cab.

I did get started on the interior before the Artic Blast arrived. One of the things I did was to add an electric cowl vent opener. The handle for opening the vent manually was behind a bunch of hoses and wires and was hard to operate. It was hard to make sure that it was closed well. I ordered a power cowl vent kit from Julianos. It was easy to install, works well, and shuts the vent very tightly.

My truck is hibernating in the garage. I am sitting in my nice warm house. OK, so I am getting soft in my old age. Six weeks after the groundhog sees his shadow, I will be back at work in the garage!


GO TO PREVIOUS PAGE    GO BACK          [HOME PAGE]          CONTINUE   GO TO NEXT PAGE